Lead Your Own AI Engineering Team with Claude Code
Learn to become a 'tech lead' for your own AI-powered development team. Use Claude Code to turn ideas into deployed apps by directing an autonomous AI engineer.
By Pranav Dhingra · November 7, 2025
Tools Used
Content Available
Ever have a great idea for an app but get stuck on the mountain of setup, boilerplate code, and testing? What if you could build it by acting as the project lead and directing a small, autonomous team of AI engineers to do the heavy lifting?
This guide shows you how to become a "tech lead" for your own one-person team, powered by Claude Code—Anthropic's powerful "agentic coding tool that lives in your terminal." We'll turn a simple idea into a deployed reality.
Part 1: Setting Up Your Toolkit
First, we need to get our tools in order.
1. Draft Your Idea (ChatPRD)
We'll use ChatPRD to draft a Product Requirements Document (PRD). This is vital because LLMs perform much better with more context. A vague request like "Build me an app that does X" isn't as effective as a detailed plan with features X, Y, and Z.
2. Manage Your Code (GitHub)
Create a GitHub account if you don't have one. This is where your code will live.
Student? Sign up for the GitHub Student Developer Pack for free benefits including Copilot Pro.
3. Get Your AI Engineer (Claude)
Claude Code is part of the Claude Pro subscription (~$20/month). Subscribe at claude.ai/pricing.
4. Get Your Code Editor (VS Code)
Download Visual Studio Code to navigate the codebase your AI engineer helps you write.
5. Install Claude Code
Open your terminal and run the installation command:
Mac (bash):
curl -fsSL https://claude.ai/install.sh | bash
Windows (PowerShell):
irm https://claude.ai/install.ps1 | iex
Windows (cmd):
curl -fsSL https://claude.ai/install.cmd -o install.cmd && install.cmd && del install.cmd
Part 2: Creating Your Project Space
If you're new to the terminal, here are the basic commands you need:
| Command | Description |
|---|---|
pwd | Shows your current directory |
ls | Lists files in current directory |
mkdir <name> | Creates a new folder |
cd <name> | Changes into a folder |
cd .. | Goes up one folder |
Set Up Your Project
# Create a 'dev' folder in your home directory
mkdir ~/dev

# Go into it
cd ~/dev

# Create your project folder
mkdir my-project-name

# Go into your project folder
cd my-project-name
Start Claude Code
Once inside your project folder, start Claude Code:
claude
Claude will start up, read the repository, and give you a summary of your project.
Final Setup
- Open VS Code - Open your project folder to watch the file structure change
- Use GitHub Copilot at any time to understand the codebase. Go to "Ask" mode and have it explain the whole project to you, as if you were a beginner.
- Create GitHub Repo - Go to github.com and create a new, blank repository
Part 3: The Tech Lead Workflow
This is where the magic happens. We'll define what to build and assign that task to Claude.
Step 1: Define the Vision
Open ChatPRD and start a new project. Example: "Build me a personal portfolio website using Next.js, TypeScript, and Tailwind CSS."
Step 2: Bring Your Vision to Claude
Copy and paste your PRD directly into the Claude Code terminal. If it's very long, export it as a Markdown file and save it in your project directory—Claude can use this file for context.
Step 3: Demand Excellent Documentation
A good team lead insists on good documentation. Give Claude this prompt after providing your PRD.
Meta tip: I didn't write this prompt myself—I asked Claude Sonnet to write a prompt for me about how to best document a new codebase. This is a great example of using AI to build better tools for yourself.
---DOCUMENTATION REQUIREMENTS---

After completing the code changes, you MUST create or update:

1. README.md - Include:
   - Project title and one-sentence description
   - Prerequisites (required software, versions)
   - Quick Start section with exact commands to run the app
   - How to test the application
   - Common issues and solutions

2. ARCHITECTURE.md - Include:
   - Visual folder structure (use tree format)
   - Purpose of each major file and folder
   - How files interact with each other
   - Data flow explanation

3. Add inline comments in the code:
   - Explain WHY decisions were made, not just what the code does
   - Add comments before complex functions
   - Use beginner-friendly language

Write ALL documentation assuming the reader has never used this technology before.
Part 4: Managing Code with Git
As you iterate, maintain good version control hygiene.
Key terminology:
- Commit: Saving your progress
- Push: Uploading code to GitHub (like Google Drive for code)
- Pull Request (PR): Putting up changes for review
Push Your First Commit
After Claude builds the first version:
Initialize a git repository and commit my changes with a descriptive
commit log. Add the following remote repository:
https://github.com/username/repo-name.git and push your changes.
Manual steps (without Claude)
# 1. Initialize git repository (if not already done)
git init
git add .
git commit -m "Initial commit: [brief description of changes]"

# 2. Link remote repository
git remote add origin https://github.com/username/repo-name.git
git branch -M main

# 3. Push to GitHub
git push -u origin main

# 4. Verify: Open your GitHub repository in a browser to confirm
Create a Feature Pull Request
When adding new features, create a PR instead of pushing directly to main:
Check out a new branch for our latest changes and commit them.
Then, put up a pull request to our repository on GitHub.
Manual steps (without Claude)
# 1. Create a new branch and commit changes
git checkout -b feature/[descriptive-branch-name]
git add .
git commit -m "[description of changes]"
git push -u origin feature/[descriptive-branch-name]

# 2. Create Pull Request
# GitHub will show a "Compare & pull request" button - click it
# OR manually: Go to your repo > "Pull requests" > "New pull request"
# Select your branch, add title/description, and click "Create pull request"
Part 5: Automating with GitHub Actions
Connect Claude directly to your GitHub repository to automatically fix issues and submit PRs.
Setup
In your Claude terminal, run:
/install-github-app
This walks you through installing the Claude Code GitHub app and configuring the necessary secrets.
New Workflow
Once installed:
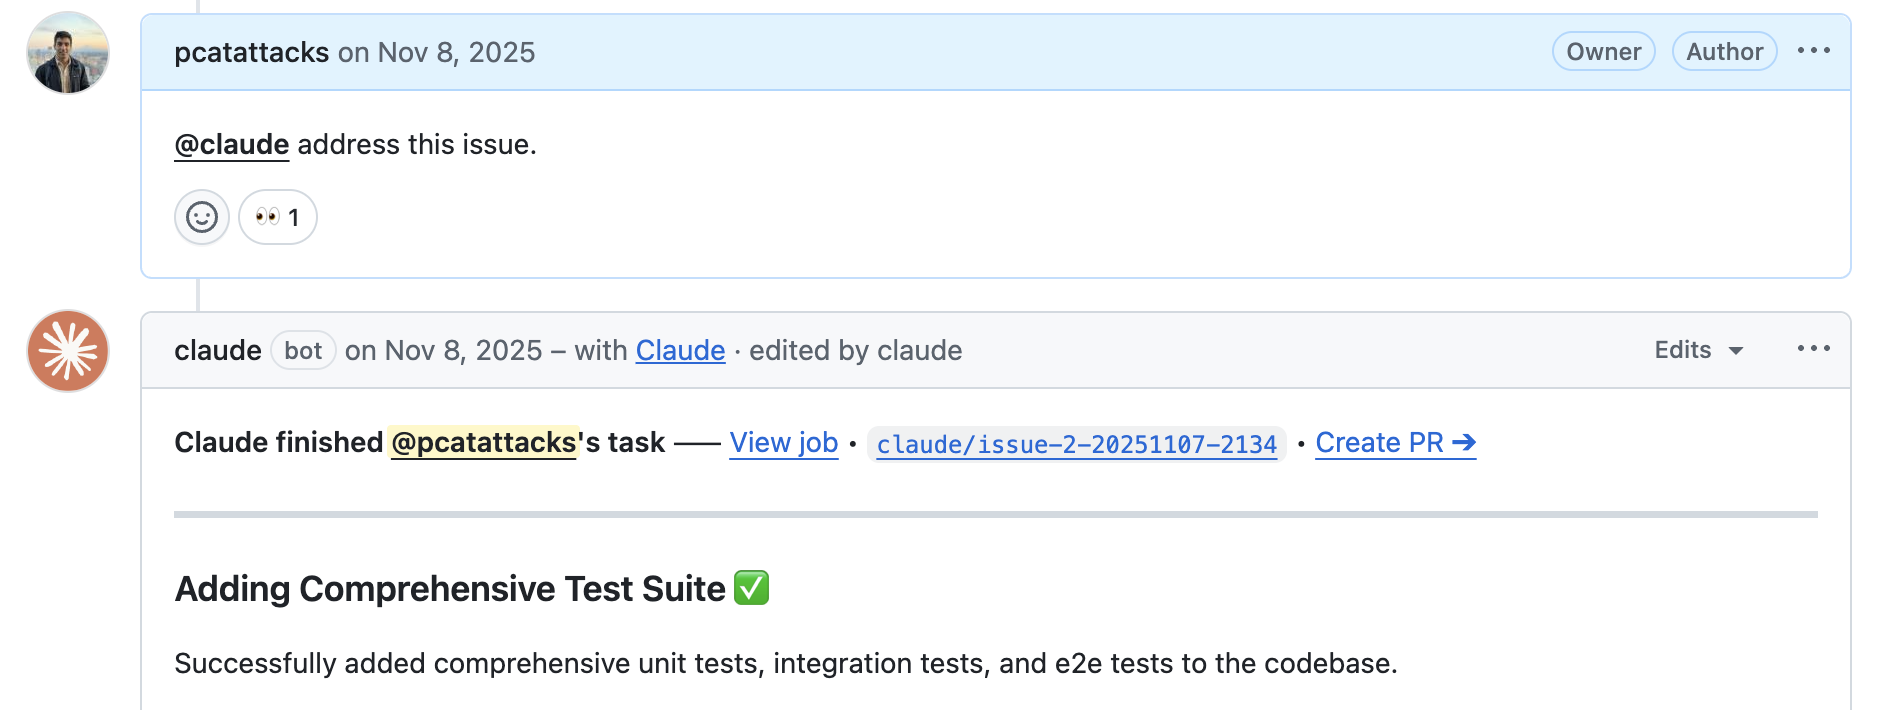
- Create a GitHub issue (e.g., "Add comprehensive test suite to the codebase")
- Comment on the issue:
@claude address this issue - Claude will respond "I'm working on it" and generate code
- Claude submits a Pull Request for your review
You can also tag Claude on PRs to review them!
Note: You can configure the GitHub Action to auto-review whenever a PR is created or commits are pushed. However, this burns through tokens quite fast. I'd recommend manually tagging Claude until you're familiar with configuring GitHub Actions.
Part 6: Debugging and Integrations
Your Personal Debugging Buddy
When you hit an error:
- Copy the entire error message
- Paste it into the Claude terminal
- Ask: "What do I do?" or "How do I fix this?"
Claude will analyze the error in the context of your project and provide step-by-step instructions.
Integrating Third-Party Services
Ask Claude directly for complex integrations:
- "How do I set up a Supabase database for this project?"
- "How do I connect this app to a Snowflake instance?"
- "What's the best way to add user authentication?"
Part 7: Best Practices
Work Safely with /sandbox
The /sandbox command creates a secure environment so Claude won't accidentally delete files. After running this, press Shift + Tab to accept edits automatically.
Keep Your Context Clean
AI models can get confused with too much history. Use these commands:
| Command | Description |
|---|---|
/init | Creates a claude.md file to store context |
/resume | Resumes a previous chat |
/compact | Summarizes conversation history and starts fresh |
/clear | Removes chat history but preserves file context |
Part 8: Understanding the Limitations
This isn't magic. You still need to provide high-level context and direction. This is why the "Tech Lead" metaphor fits—you are the architect, the AI is the builder. If you give it a bad plan, it will build a bad building.
The new role of the developer: These tools automate a vast amount of junior software engineer work. Your role shifts from writing boilerplate to being the Tech Lead. Claude is your engineer. You are the director, the prompt engineer, and the code reviewer.
This workflow makes it easier than ever to go from "0 to 1"—to take an idea from a simple thought to a real, working application.
Resources
- Claude Code Documentation
- ChatPRD - AI-powered PRD generation
- GitHub Student Developer Pack
- Claude Code Best Practices